
RotaRod Hardware Manual
General Safety Summary
- Read the following safety precautions carefully to avoid personal injury and to prevent damage to the product or any product connected to the product.
- To avoid possible hazards, be sure to use this product as specified.
- Do not remove or repair this product without the authorization of our company.
- Use a power cord that is certified in USA.
- Before using the Rotarod, please connect the Rotarod correctly with reference to this manual to ensure proper wiring when the power is turned off.
- Do not use this product when the cover is open.
- If you suspect that the product is damaged, please contact our technical staff for maintenance. Don't open and repair this product.
- Do not use in humid environments. Please ensure proper ventilation.
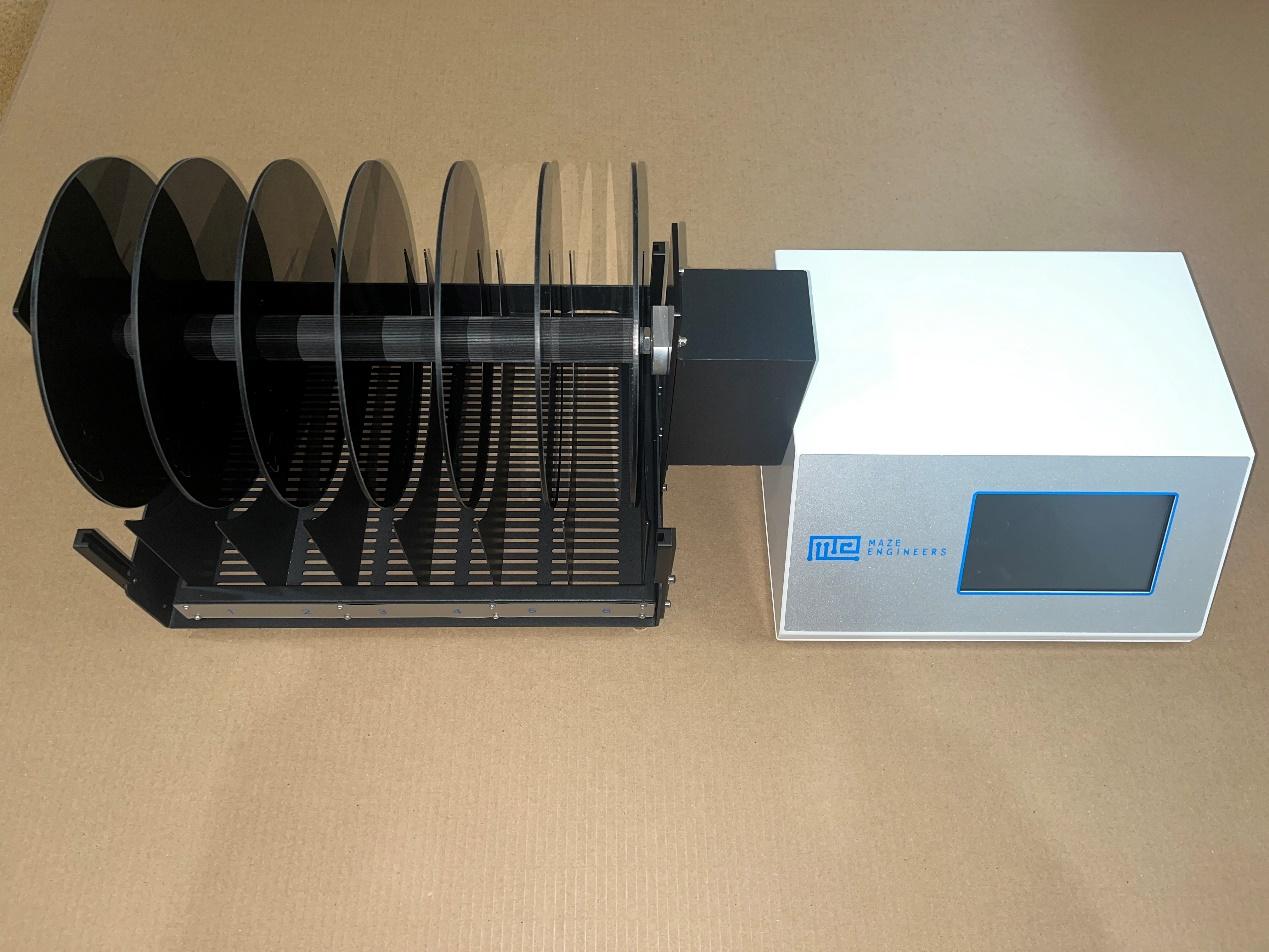
Product Key Features
High Quality LCD Monitor
Capacitive touch screen with less than 3ms response speed
Servo Motor
The product uses a high-end servo motor as a main component with control accuracy of 0.0001M and speed range 0-100 m/min.
Acceleration
The product can be set to run a uniform acceleration or uniform deceleration mode of operation. The acceleration range 0-100 r/min².
Multi-step Speed Control
The product allows multi-step speed control. Each step can be set to different parameters (time, speed, acceleration).
Rotation Mode
The Rota-Rod supports forward and reverse rotation modes. Forward rotation is the common rotation mode.
Record Persistency
The product comes with a power-down saving function - save up to 200 experiment results.
Data Browse
The browse function allows users to choose previous experiment results, display them and export to a CSV format.
Data Export
Use the included Rotarod computer software to upload data as a CSV file.
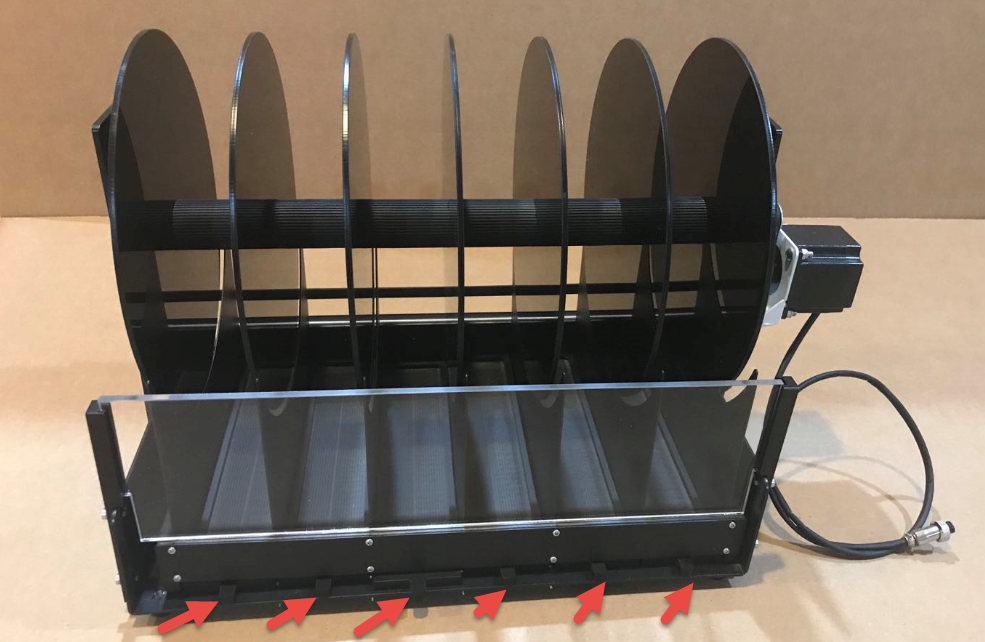
Individual Lane Counting
Each lane counts duration and drop speed. Each lane includes a sensor to detect subject drop. We suggest loading all the subjects into each rod, starting the Rotarod at 4 r/min before starting the trials, as lane counting occurs simultaneously.
Experiment Environment
The instrument comes with high-precision temperature and humidity sensor, real-time monitoring of laboratory temperature and humidity environment and save the record of the parameters along with the experiment results.
Usage Instructions
System Connection
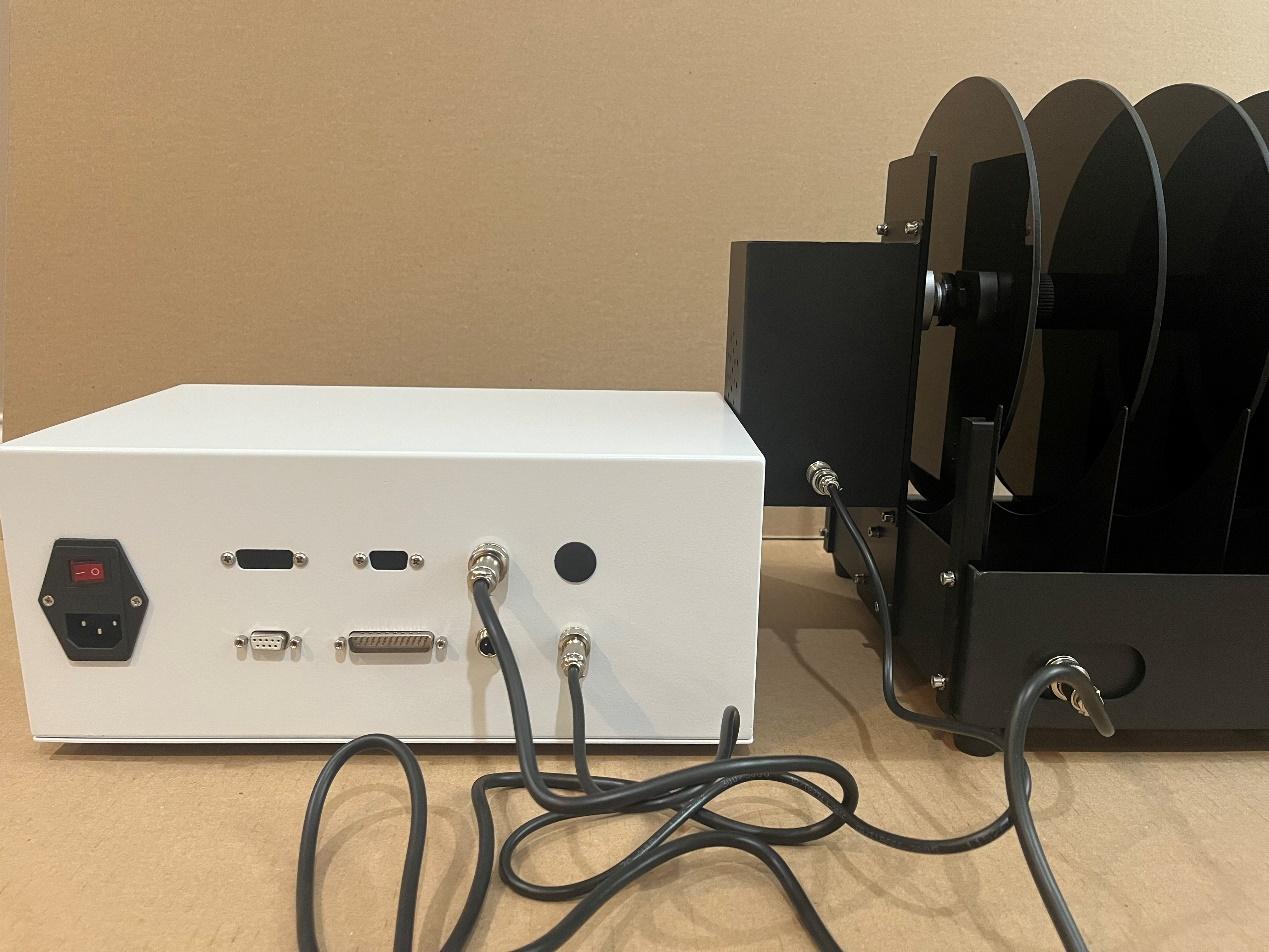
- Left: power cord (110V-60HZ)
- Lower middle: USB To RS232 cable connecting Rotarod and PC
- Lower right: motor wire connecting to the rotarod runner
- Upper right: sensor cable connecting to the rotarod runner
Trays
Removable tray
Experiment
Power On
When Power is turned on, the standby screen shows two labels: Delete! (top label) and Enter<<< (bottom label)
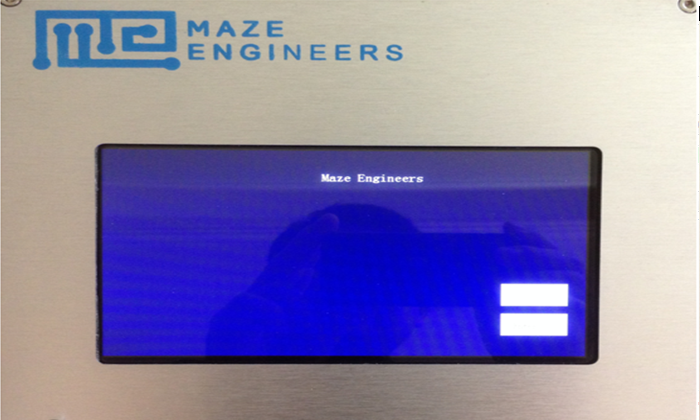
Standby mode
- If Delete! is pressed, the previous experiment result data is deleted, and the next experiment group (experiment ID) is reset to 1.
- Click Enter, and the experiment window appears.
Experiment Setup
On the experimental setup screen, the left-hand side of the screen displays results in real-time. The middle of the screen, under "Section", is where protocols are displayed. The right side of the screen is where protocols can be set up and parameters can be adjusted. If used previously, the last protocol set will be saved on the experimental setup screen.
The result data include:
- Latency - time on rod in seconds
- Drop Speed - the speed meter/minute when the animal falls
- Distance - the distance in meters travelled
- State - Normal or drop (fell off the rod)
System Time Setting
Press on the system time display on the upper-right corner. Adjust time stamp using +- key and save the setting.
System Parameters
The top row shows the following information:
- Experiment group (Experiment ID)
- Start time
- Number (Lane number)
- Temperature
- Humidity
Note that the number should be set to the number of lanes. For example, if your Rotarod has 6 lanes, the number should be set to 6.
Speed Setup
The Rotarod supports constant speed, constant acceleration (deceleration). The system default to the last setting.
If you choose to change it, click Del key and all previous speed steps are deleted. Then set time period, acceleration, speed. Click on Add Step to add the speed step to the configuration on the Section area.
Example: Single Speed Step
You want to have an experiment run of total 30 minutes, speed 10 r/min, acceleration 6 r/min².
Follow the following steps:
- Press Del button. The previous line(s) are deleted and one line is added to reflect the current data on the configuration panel
- Set TotalTime to 30 minutes
- Set Section time to 30 minutes
- Set speed to 10 r/min
- Set acceleration to 6 r/min² (it takes 1 minute to change the speed from 4 r/min to 10 r/min)
- Press Add Step. The Section time becomes 0, meaning that the total time is fully allocated
- Your setup is shown in the right Section of the left panel. Click 4 r/min Running or Start to run Rotarod
- Use hand to signal the individual lane counting (see section below for more description)
- You can press Stop to stop Rotarod running or wait until the total time is up
Multiple-step Speed Setup
Example: Two Speed Steps
You want to have an experiment run of total 30 minutes with two speed steps:
- Step 1: from 0-5 minutes, speed 10 r/min, acceleration 10 r/min²
- Step 2: from 6-30 minutes, speed 20 r/min, acceleration 15 r/min²
Follow the following steps:
- Press Del to delete previous speed step(s)
- Set TotalTime to 30 minutes
- Set Section time to 5 minutes
- Set speed to 10 r/min
- Set acceleration to 10 r/min²
- Press Add Step
- Your setup is shown in the right Section of the left panel with two lines:
| Section | ||
|---|---|---|
| Time | Speed | ACC |
| 5 | 10 | 10 |
| 25 | 10 | 10 |
The second line is added for the remaining 25 minutes to be configured.
- Now continue to setup the second step. Set Section time to 25 minutes, speed to 20 r/min, acceleration to 15 r/min², then press Add Step
- Your setup of the second speed step is reflected in the second line:
| Section | ||
|---|---|---|
| Time | Speed | ACC |
| 5 | 10 | 10 |
| 25 | 20 | 15 |
Your setup is ready now.
- Click 4 r/min Running or Start to run Rotarod
- Use hand to signal the individual lane counting
- You can press Stop to stop Rotarod running or wait until the total time is up
Note that the max number of speed steps is 8.
Example Protocol: 5 min to 40 rpm
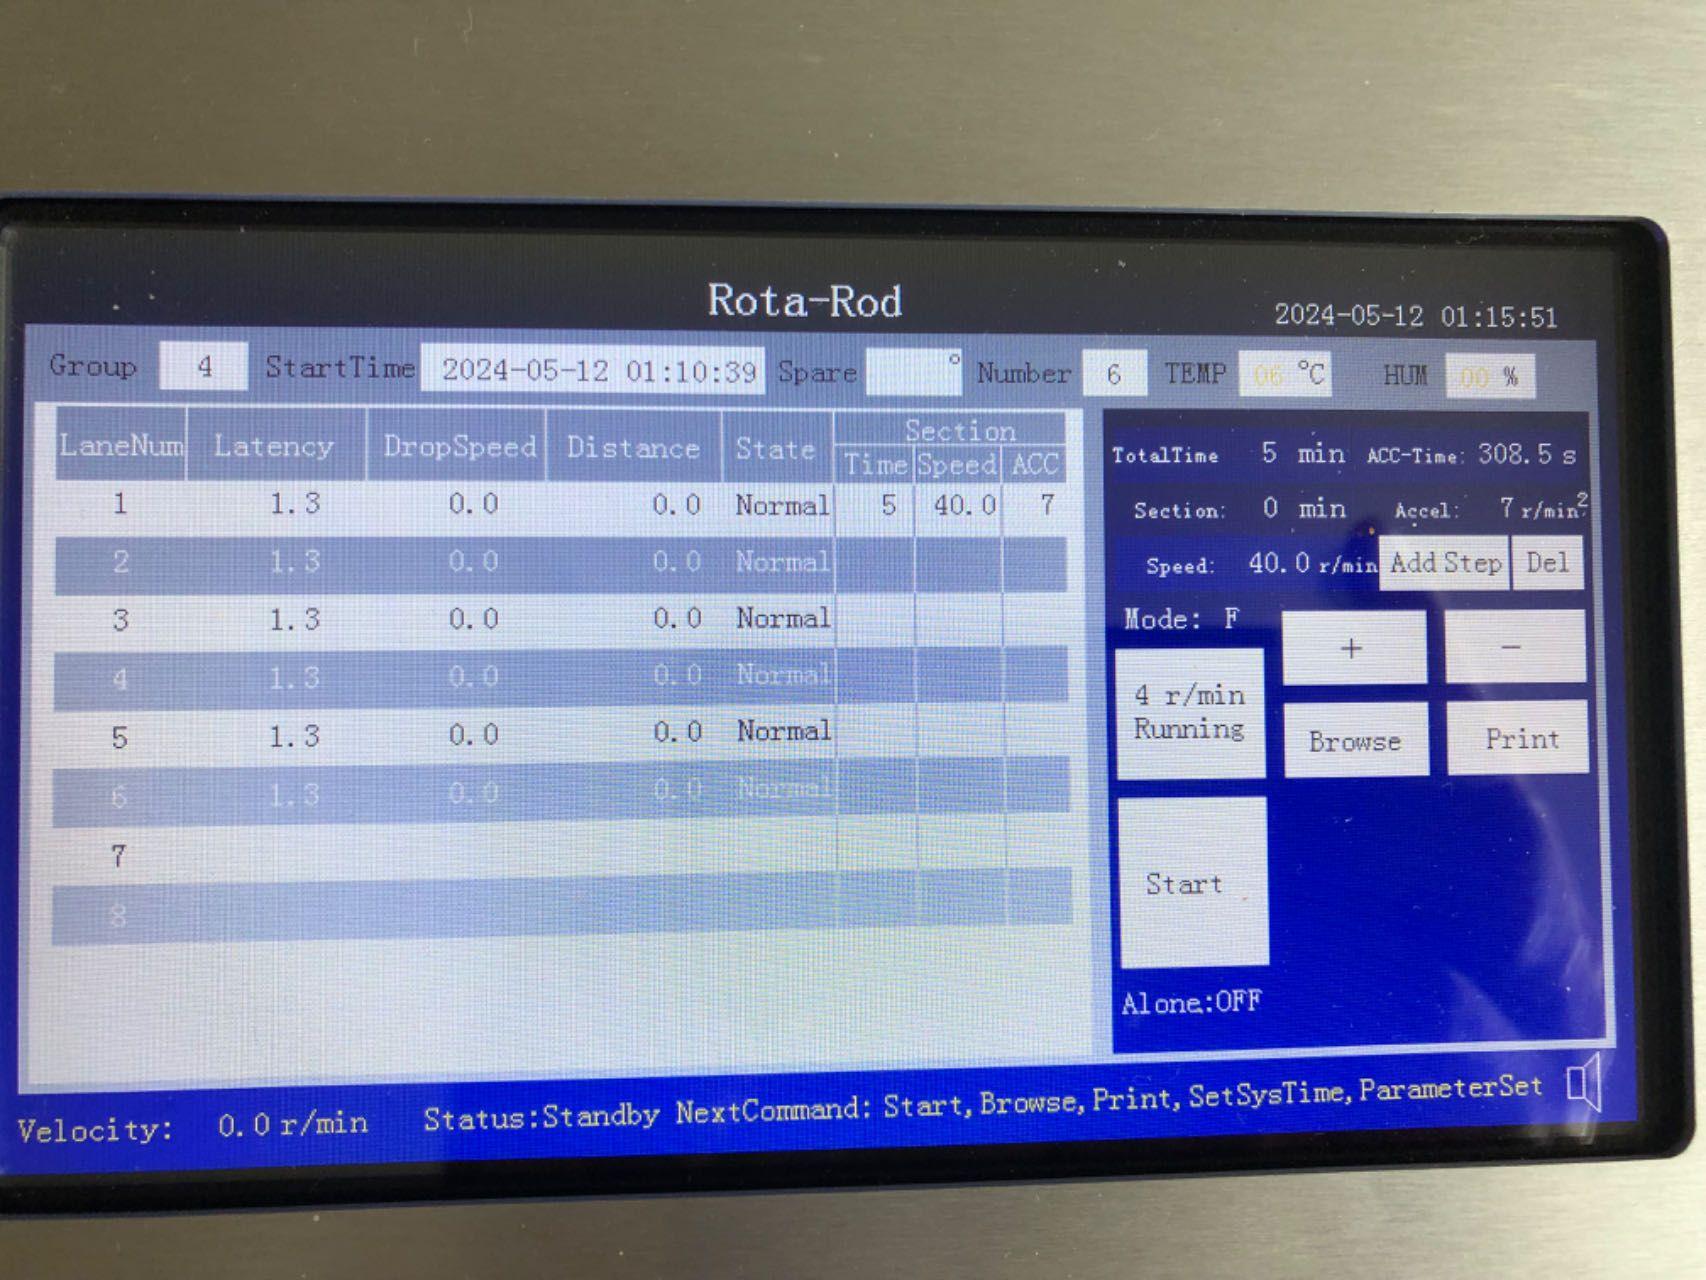
Start the Rotarod at 4rpm for loading animals without counting.
To achieve 40 rpm in 5 min, the acceleration is:
a = (40 - 4) / 5 = 7.2
Since a is integer only, we can set it to 7. After 5 min, the speed would be 39 rpm (close to 40).
Forward and Reverse Mode
Press Mode and use +- to change the mode between F (forward) or R (reverse)
Start Experiment
Click 4 r/min Running on the screen, the Rotarod will run at 4 r/min but does not perform any counting. This allows animals to be put on the rods in the running position.
Click on Start on the screen, the Rotarod will start the experiment. The current speed is shown on the bottom line.
Use hand to signal the individual lane counting. The result output is updated in real-time.
The Rotarod stops running when the total time is up or the user manually stops it.
Individual Lane Counting
Each lane has its own counting capacity. Each lane is equipped with a sensor from the front to the back. When you use your hand to break the sensor light of a lane, the system beeps and the lane counting starts.
Real-time Speed
The real-time speed is shown on the lower left panel of the screen.
Real-time Speed Adjustment
After the experiment run starts, speed can be adjusted using +- buttons.
Stop Experiment
Click the Stop, to stop the experiment. By default, the Rotarod runs till the end of the experiment total time.
System State and Operation Reminder
The current system state is shown on the lower screen. The states include: Standby, Set, Running, Pause, View and Set-Time.
Below are the available operations on each state:
- Standby: Start, View, Print, SetSysTime, ParameterSet
- Set: Start, +- parameters
- Running: Stop, Pause, Electric, Light, Sound, +-SetSpeed
- Pause: Stop, Resume
- Browse: +-ChangeGroup, Print
- SetTime: change timestamp
Browse Data and Export
Put the Rotarod control box into "Standby" mode with the starting screen on. Connect the control box to your computer with the software installed and open. You can view results and export (see the separate document "Maze Engineers Rotarod Software User Manual.pdf" for more details).

Precautions for Experiments
- Regular cleaning of equipment, including rods and trays, is needed to achieve the best experimental results.
- Avoid cleaning electronic components such as sensors, plugs, and contacts with liquid cleansing agents; use a dry cloth instead.
- The following cleaning agents are suitable for use, ideally with a damp cloth:
- Unscented soap and water
- 70% Ethanol (avoid using on the clear acrylic lanes to prevent cloudiness and brittleness)
- 4% Acetic acid
- 5% Hydrogen Peroxide (products such as HaloMist)
- 4% Didecyl dimethyl ammonium chloride (DDAC) and 4% Alkyl dimethyl benzyl Ammonium chloride (products such as Sani-Plex 128)
- Hydrochlorus water 100ppm
Warning: Please power off before cleaning the equipment
Shipping List
| No | Item | Qty | Note |
|---|---|---|---|
| 1 | Rotarod main body | 1 | |
| 2 | Power cord | 1 | |
| 6 | USB to 232 cable | 1 | |
| 7 | Upload result software | 1 | |
| 8 | Motor cable | 2 |